DevOps After Bubble: CI/CD, Git, and Deployment for Former No-Code Teams
Bubble handled deployment, hosting, and version management invisibly. After migration, your team needs Git workflows, CI/CD pipelines, staging environments, and production monitoring. This guide covers the essential DevOps infrastructure for teams transitioning from no-code to custom code — with tool recommendations, cost breakdowns, and setup priorities.
14 min read
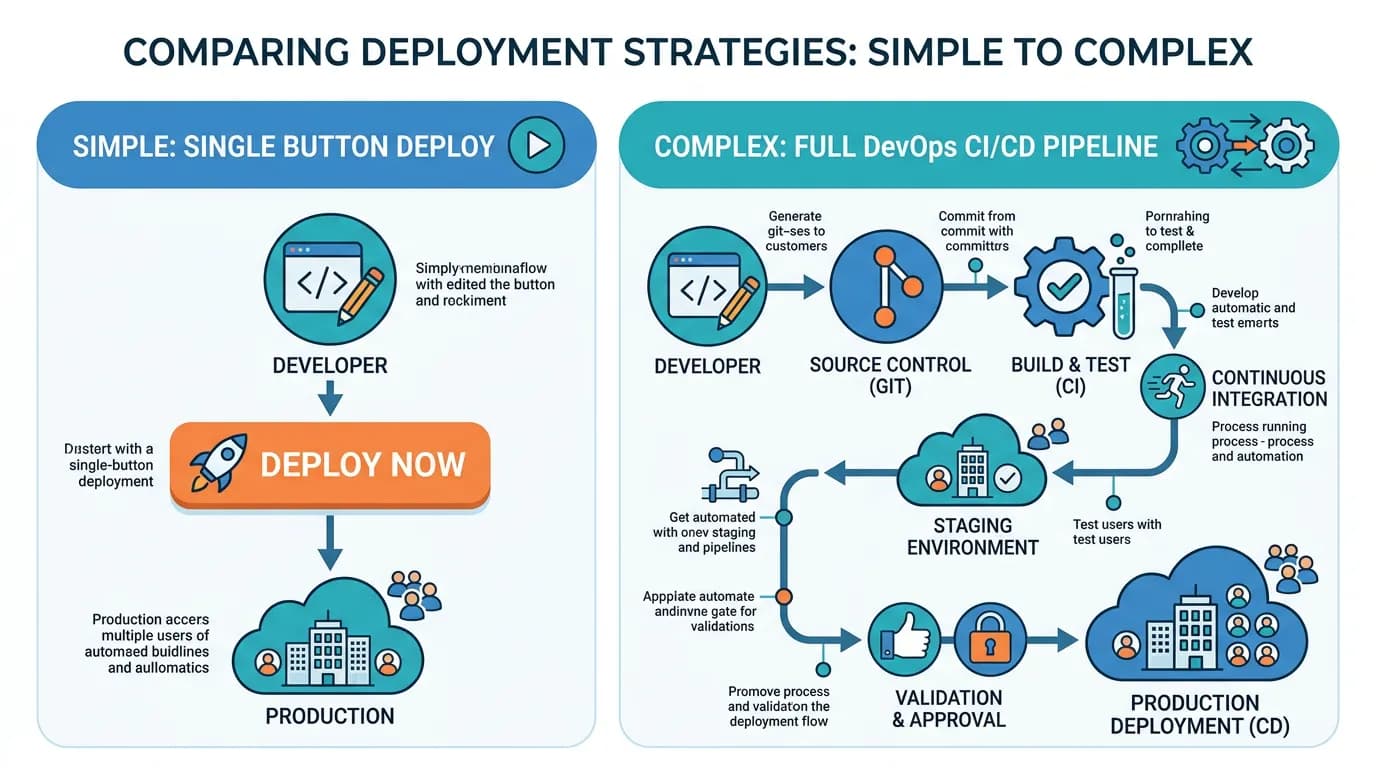
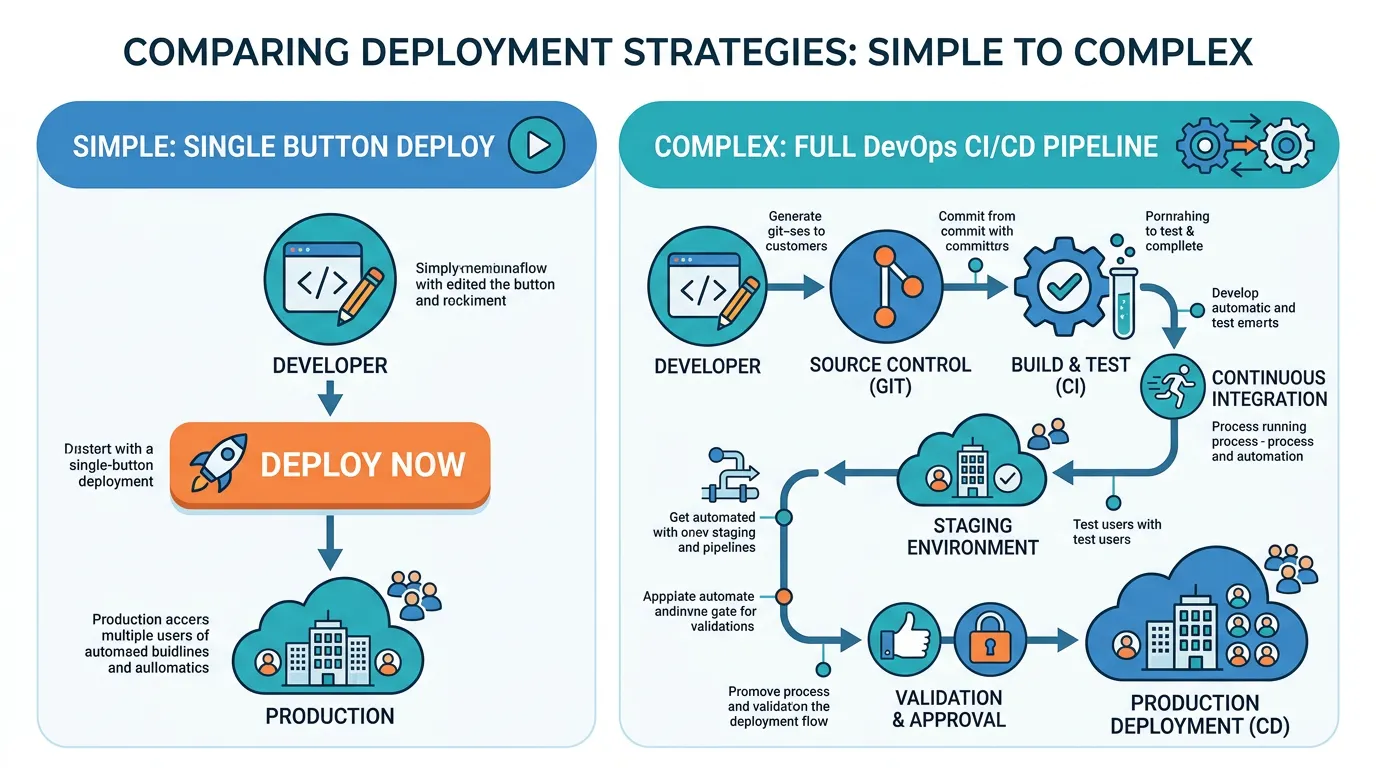
On Bubble, DevOps was invisible. You clicked "Preview" to test, "Deploy to Live" to launch, and Bubble handled everything in between — hosting, SSL certificates, database management, version history, and version restore. After migration, you own all of this. And while that ownership is exactly what motivated the migration (control, performance, compliance), it comes with operational responsibilities that most no-code teams have never managed.
This guide is not a comprehensive DevOps textbook. It is the minimum viable operations setup that keeps your migrated app running reliably while your team learns the ropes. Start with these essentials, and add sophistication as your team and infrastructure mature.
What Bubble Did for You (That You Now Own)
| Bubble Handled | You Now Own | Tool/Service Needed |
|---|---|---|
| Hosting and servers | Application hosting | Vercel, Railway, AWS, or DigitalOcean |
| SSL certificates | HTTPS configuration | Auto-provisioned by most hosts |
| Database management | PostgreSQL hosting and backups | Supabase, Neon, AWS RDS, or Railway |
| Version history (undo) | Git version control | GitHub, GitLab, or Bitbucket |
| Preview/test mode | Staging environment | Separate deployment on same host |
| Deploy to Live button | CI/CD pipeline | GitHub Actions, Vercel, or Railway |
| Uptime and performance | Monitoring and alerting | UptimeRobot, Sentry, Vercel Analytics |
| Automatic scaling | Scaling configuration | Serverless (Vercel) or manual (AWS) |
The Essential DevOps Stack
You do not need AWS, Kubernetes, or a dedicated DevOps engineer on day one. Start with the simplest stack that works and add complexity as your team and traffic demand it.
| Component | Solo/2-Person Team | 3–5 Person Team | 6+ Person Team |
|---|---|---|---|
| Hosting | Vercel (auto-deploy) | Vercel or Railway | AWS / GCP with Terraform |
| Database | Supabase or Neon | Supabase or AWS RDS | AWS RDS with replicas |
| Git hosting | GitHub (free) | GitHub Team | GitHub Enterprise or GitLab |
| CI/CD | Vercel auto-deploy | GitHub Actions | GitHub Actions + custom pipelines |
| Monitoring | UptimeRobot + Sentry (free) | Sentry + Vercel Analytics | Datadog or New Relic |
| Monthly cost | $0–$50 | $50–$200 | $200–$1,000+ |
For Next.js applications (the most common Bubble migration target), Vercel provides hosting, CI/CD, staging previews, and analytics in a single platform. Push to Git → Vercel builds and deploys automatically. Each pull request gets a preview URL (your staging environment). This is the closest thing to Bubble's "Preview + Deploy" simplicity in the custom code world. Most post-Bubble teams should start here.
Git Workflows for Small Teams
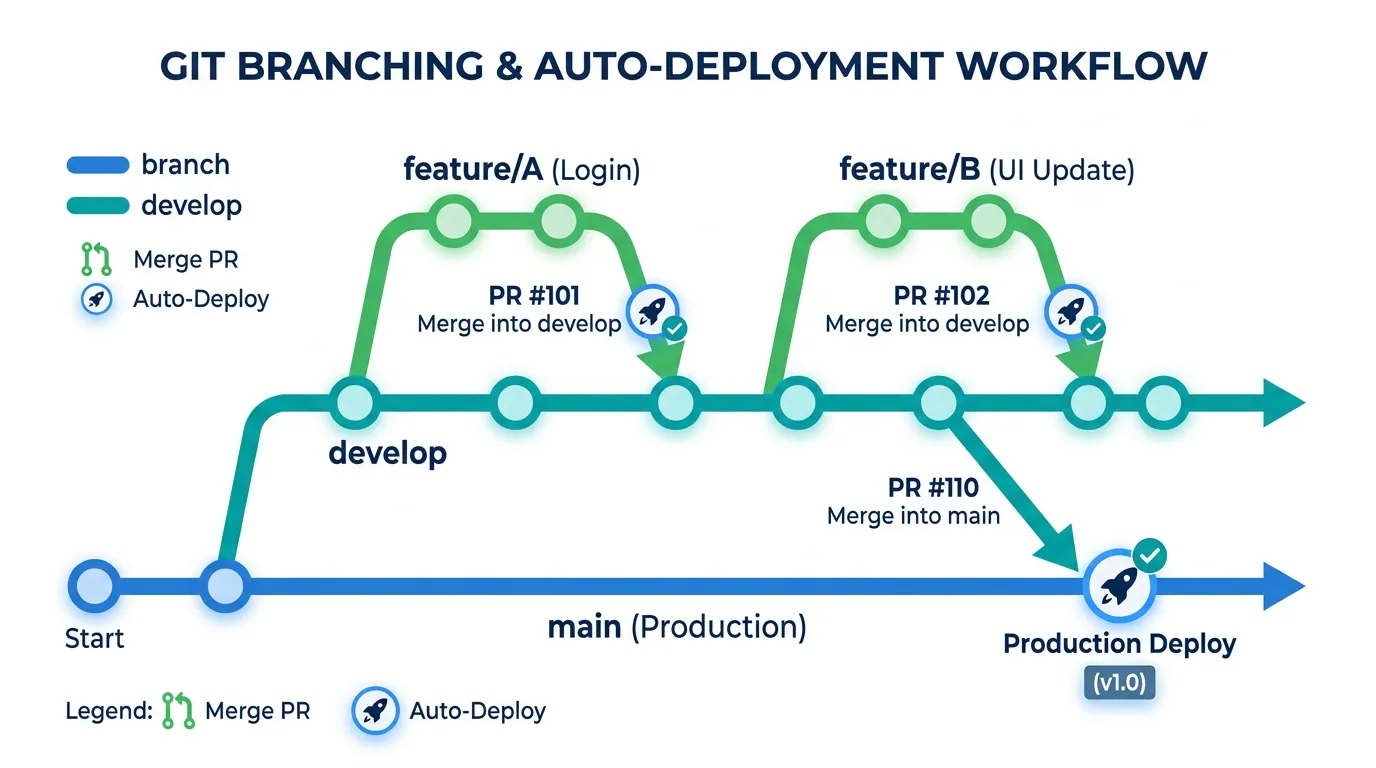
On Bubble, you edited the live app directly (or used version control with "Save as" snapshots). In custom code, Git manages every change with full history, branching, and collaboration support.
The Minimal Git Workflow
For solo developers or 2-person teams: work on a main branch for production code and create feature branches for new work. The workflow: create a branch (git checkout -b feature/new-dashboard), make changes and commit, push and create a pull request, review the PR (even if you are the only reviewer — the PR creates a changelog), merge to main, and Vercel auto-deploys.
The Team Git Workflow
For 3+ person teams, add a develop branch as a staging integration point. Feature branches merge to develop (deploys to staging). develop merges to main (deploys to production). This prevents half-finished features from reaching production and gives the team a shared staging environment for integration testing.
Commit Message Convention
Adopt a convention from day one — it makes the Git history readable and enables automated changelogs. The most common: Conventional Commits (feat: add user dashboard, fix: resolve login timeout, docs: update API documentation). Every commit message has a type, optional scope, and description. This costs zero extra time and saves hours when debugging production issues by reading the commit history.
CI/CD: Automated Testing and Deployment
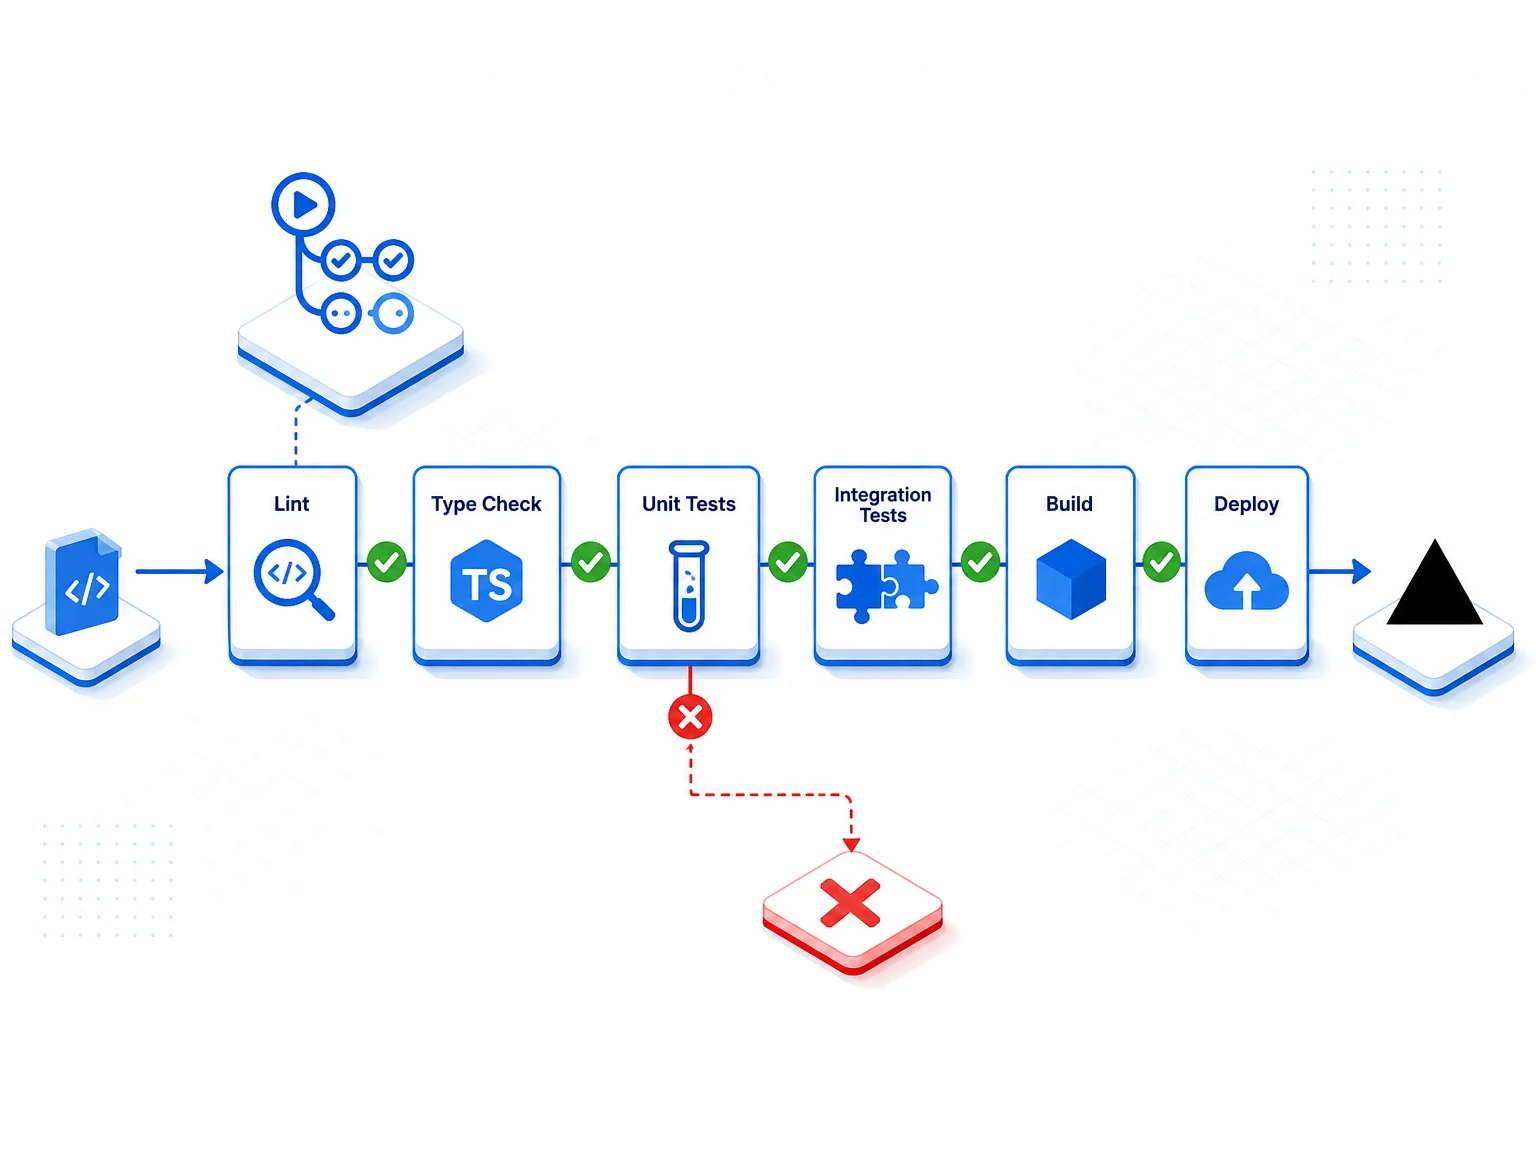
CI/CD (Continuous Integration / Continuous Deployment) replaces Bubble's "Deploy to Live" button with an automated pipeline that runs tests before deploying. This prevents broken code from reaching production.
The Minimal CI/CD Pipeline
A basic pipeline has three steps: lint (check code style and catch common errors), test (run automated test suite), and deploy (push to hosting if all checks pass). On Vercel, this is mostly automatic — Vercel runs your build command and deploys on success. Add GitHub Actions for linting and testing that runs before the Vercel deploy.
What to Automate First
- Build check: Does the code compile without errors? (Catches most issues)
- Type checking: Does TypeScript find any type errors? (Catches logic bugs)
- Lint: Does the code follow style conventions? (Prevents code quality degradation)
- Unit tests: Do the core functions work? (Catches regressions)
- Integration tests: Do the API endpoints work end-to-end? (Catches broken features)
Start with items 1 to 3 (zero test-writing needed — just configuration). Add tests (items 4 to 5) incrementally as you build confidence.
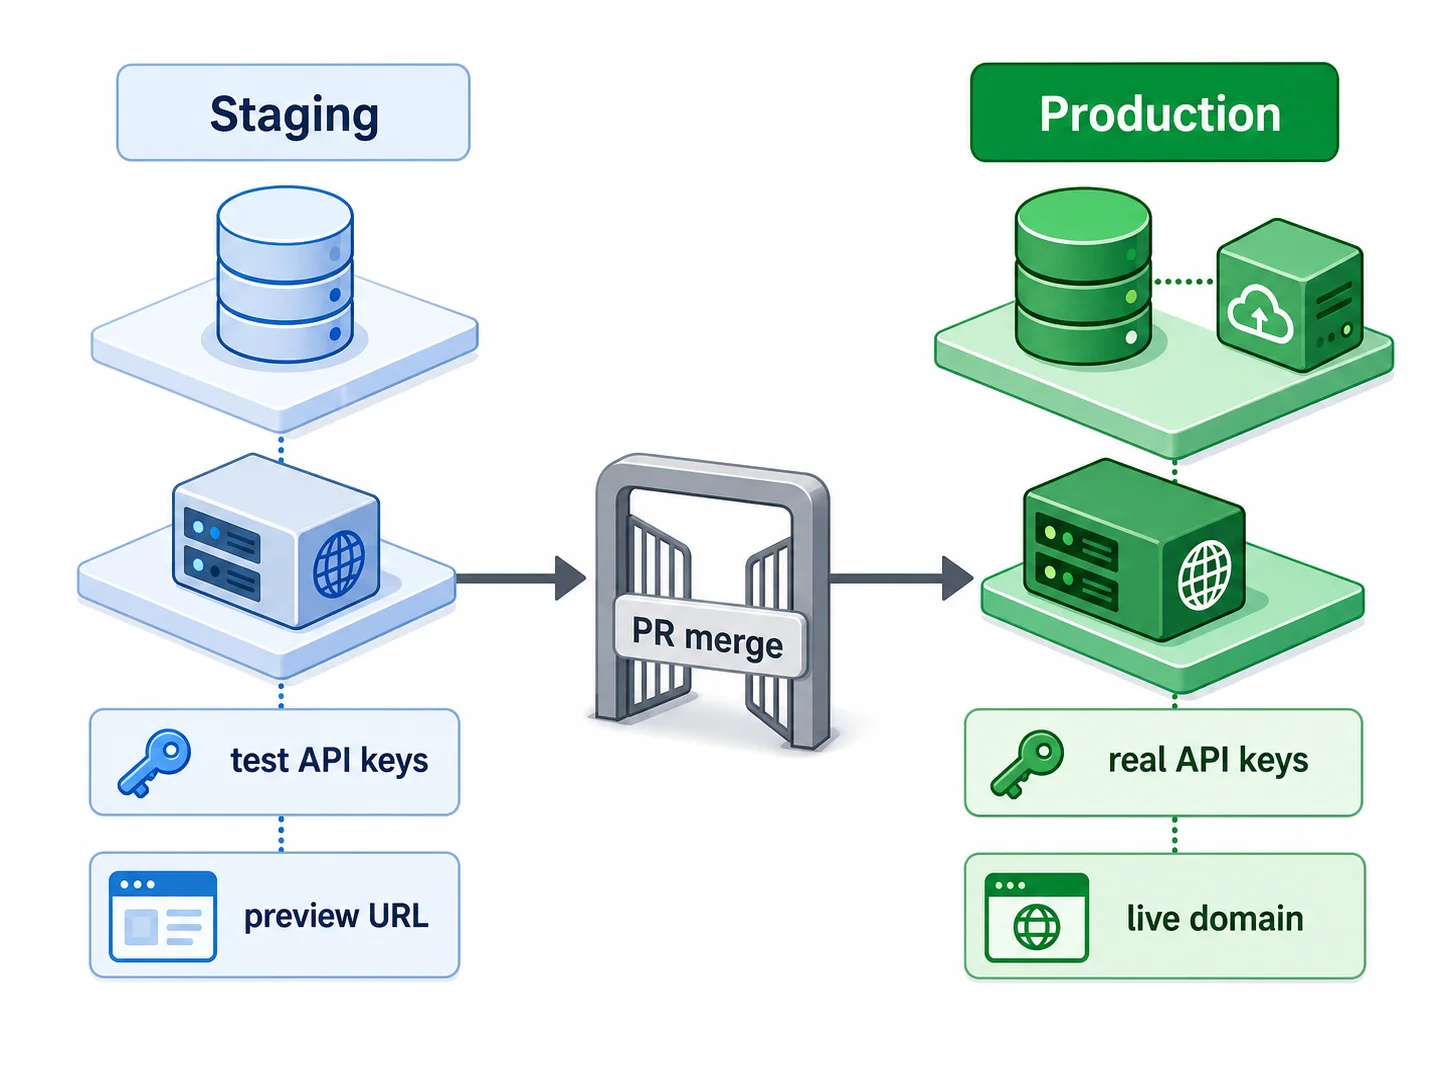
Staging and Production Environments
Bubble had "Development" mode and "Live" mode. In custom code, you manage multiple environments yourself.
The Two-Environment Setup
Staging: A complete copy of your app with its own database, running the latest development code. Test here before deploying to production. Use separate API keys (Stripe test mode, an email-provider sandbox/test API key). Vercel provides this automatically with preview deployments — every pull request gets its own URL.
Production: The live app your users access. Only receives code that has passed staging testing and CI/CD checks. Uses production API keys, production database, and production monitoring.
Environment Variables
Each environment has its own set of variables: database URLs, API keys, feature flags. Never share production credentials with staging. Store environment variables in your hosting platform (Vercel Environment Variables, Railway Variables) — not in code files. Use .env.local for local development (gitignored — never committed).
Bubble backed up your database automatically. In custom code, you configure backups yourself. Set up automated daily backups for your production PostgreSQL database. Most managed database providers (Supabase, Neon, AWS RDS) include automatic backups — verify they are enabled and test a restore at least once. A backup that has never been tested is not a backup.
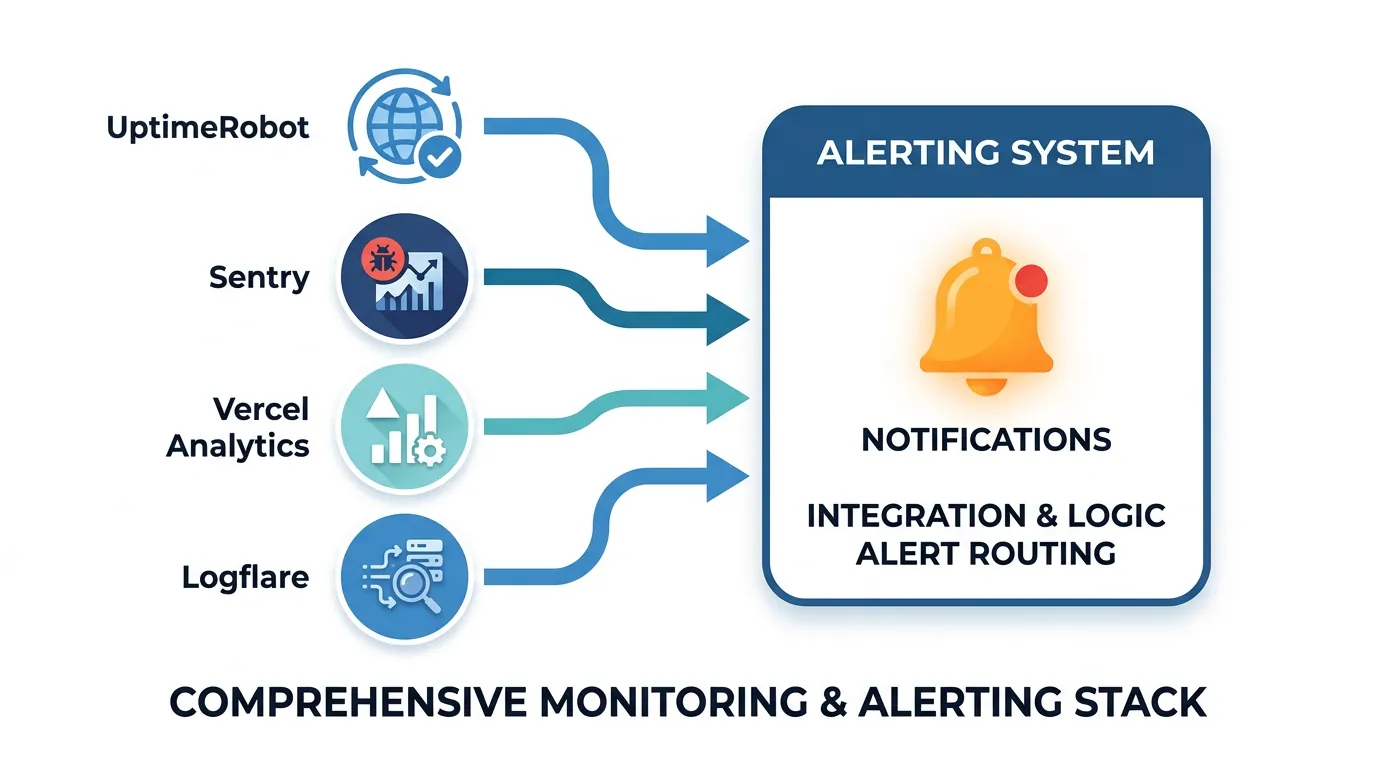
Monitoring, Logging, and Alerting
On Bubble, if something broke, users told you. In custom code, monitoring tells you before users notice — if you set it up.
Day One Monitoring (Non-Negotiable)
- Uptime monitoring: UptimeRobot (free) pings your app every 5 minutes (free tier minimum) and emails you if it is down
- Error tracking: Sentry (free tier) captures runtime errors with stack traces — you know what broke and where
- Performance baseline: Vercel Analytics (included) tracks page load times and Web Vitals
Week Two Additions
- Database monitoring: Query performance, connection pool usage, storage growth
- Background job monitoring: Job queue depth, failure rate, processing time
- Log aggregation: Centralized logging for debugging production issues
Alerting Rules
Set up alerts for: site down for 2+ minutes (P0 — call someone), error rate above 1 percent (P1 — investigate within 1 hour), response time p95 above 3 seconds (P2 — investigate within 24 hours), and database connection pool above 80 percent (P2 — scale before it hits 100 percent). Start with email alerts. Add Slack/PagerDuty as your operational maturity grows.
The 30 minutes it takes to configure UptimeRobot and Sentry pays back on the first day something breaks in production. Treat monitoring as part of the launch checklist, not an afterthought. Your Sentry DSN goes in environment variables alongside your database URL. Your UptimeRobot check URL is your production domain root. Both services have generous free tiers — there is no cost reason to skip this step.
Frequently Asked Questions
Q. Do I need a DevOps engineer after migrating from Bubble?
Not immediately. Managed platforms (Vercel, Railway, Supabase) handle most operational complexity. A full-stack developer with basic DevOps knowledge is sufficient for teams under 5 people. Hire a DevOps specialist when: you self-host infrastructure (AWS/GCP), you need multi-region deployment, or your team exceeds 5 to 8 developers and needs more sophisticated CI/CD pipelines.
Q. How much does DevOps infrastructure cost?
For a typical solo-developer post-Bubble SaaS app: Vercel Pro ($20 per user/mo) + Supabase Pro ($25/mo) + Sentry free tier + UptimeRobot free tier ≈ $45/month. Compare to Bubble's mid-to-high tier paid plan (figures around $349/mo have been published in past pricing snapshots — verify bubble.io/pricing) + WU overages. Most teams spend less on custom infrastructure than they did on Bubble — with dramatically better performance. Costs scale per-seat as the team grows.
Q. How often should I deploy to production?
After stabilization (first 30 days): as often as you want. With proper CI/CD, every merged pull request can deploy automatically. Start with weekly deploys to build confidence, then move to daily or continuous deployment as your test coverage improves. The more frequently you deploy, the smaller each change and the lower the risk per deployment.
Q. What happens if a deployment breaks production?
Rollback. Vercel keeps previous deployments and can revert to the last working version in one click. Railway and most platforms offer similar instant rollback. This is actually faster than Bubble's version restore — rollback happens in seconds, not minutes. Always verify that your hosting platform supports instant rollback before your first production deploy.
Q. Do I need Docker or Kubernetes?
No — not for most post-Bubble teams. Vercel, Railway, and Render deploy directly from Git without Docker. Docker adds value when: you need reproducible builds across environments, you self-host on VPS/cloud VMs, or you have complex multi-service architectures. Kubernetes is for teams with 10+ services and dedicated platform engineering staff. Start without it.
Q. How do I handle database migrations (schema changes)?
Use a migration tool (Prisma Migrate, Drizzle Kit, or raw SQL migration files). Each schema change is a versioned migration file that runs in order. Test migrations on staging before production. Never modify the production database schema manually — always go through the migration tool so changes are reproducible and reversible.
Start Simple, Add Complexity as You Grow
- Bubble handled DevOps invisibly — now you own it: Hosting, deployment, version control, monitoring, and backups are your responsibility. This is the control you wanted — and the operational work that comes with it.
- Start with managed platforms: Vercel + Supabase + GitHub provides hosting, database, CI/CD, and version control for around $45/month for a solo-developer setup (Vercel Pro is per-seat, so costs grow with the team). This is simpler than Bubble's deployment process and costs a fraction of what Bubble charged.
- Git is your new version control: Branching, pull requests, and code review replace Bubble's "Save" and "Deploy" buttons. Adopt Conventional Commits from day one for readable history.
- CI/CD prevents broken deployments: Automated build checks, linting, and tests run before every deploy. Start with build + type check (zero test writing), add tests incrementally.
- Monitoring is non-negotiable from day one: Uptime monitoring and error tracking are free and take 30 minutes to set up. They are the difference between finding bugs yourself and having users find them for you.
DevOps after Bubble is simpler than it sounds. The tools are mature, the managed platforms handle the hard parts, and the total cost is usually lower than your Bubble plan. Start with the essentials, learn as you operate, and add sophistication as your team grows.
Get Your Architecture Documentation Before You Build Infrastructure
Relis extracts your complete Bubble architecture — the specification that determines which infrastructure components you need. Know what you are deploying before you set up how to deploy it.
Scan My App — FreeSee Your Bubble Architecture — Automatically
Stop reverse-engineering by hand. Relis extracts your complete database schema, API connections, and backend workflows in under 10 minutes.
See Your Bubble Architecture — Automatically
Stop reverse-engineering by hand. Relis extracts your complete database schema, API connections, and backend workflows in under 10 minutes.