Migrating Bubble API Connectors: Rebuilding Every External Integration from Specs
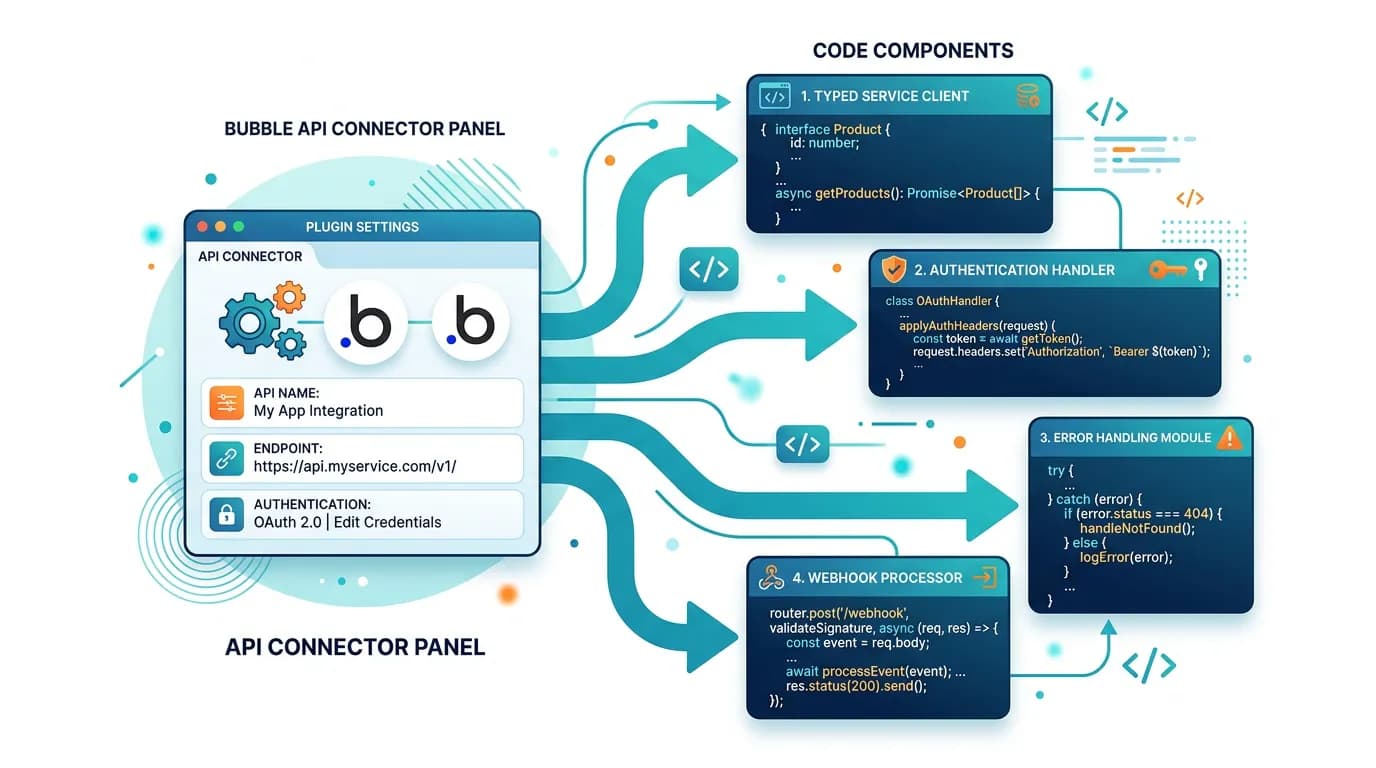
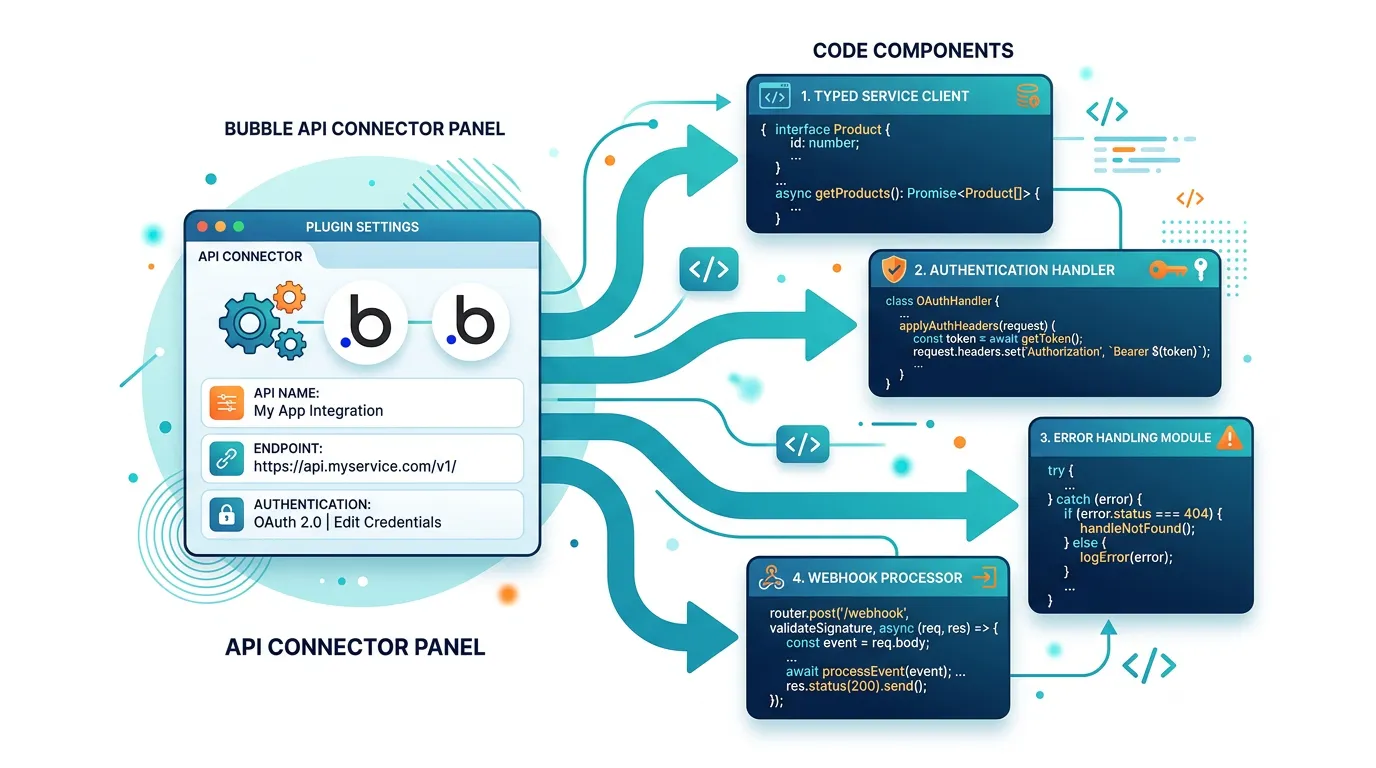
Bubble's API Connector stores the complete configuration of every external service your app talks to — endpoints, auth methods, headers, parameters, and response structures. This guide covers how to extract these specifications, translate them to typed service clients, and handle the authentication, error handling, and webhook patterns that Bubble managed invisibly.
15 min read
API Connectors are Bubble's interface to the outside world. Every Stripe charge, every SendGrid email, every Twilio SMS, and every custom API call flows through an API Connector entry that stores the endpoint URL, authentication method, request headers, query parameters, and JSON body structure. During migration, every one of these configurations must be translated into a typed service client in your new codebase — and getting even one wrong means a silent integration failure.
The challenge is documentation. API Connector configurations live in Bubble's editor with no export function. A developer cannot inspect them without editor access, and even with access, clicking through, for example, 8 connectors with 23 endpoints to document every parameter is tedious and error-prone. Relis extracts these specifications automatically — endpoint URLs, auth methods, headers, parameters, and response structures for every connector — giving your development team the exact specifications they need to rebuild each integration.
Why API Connectors Are the Second-Hardest Migration Layer
After backend workflows, API Connectors are the most commonly underestimated migration component. The underestimation follows a pattern: agencies scope "3 API integrations" as a line item, when for a representative app the realistic decomposition might look more like 3 connectors × 8 endpoints × 4 auth configurations × 12 error cases — easily 100+ individual components.
The Iceberg Effect
A "Stripe integration" in Bubble is one API Connector entry. That entry contains: a customer creation endpoint, a subscription creation endpoint with proration parameters, a payment method attachment endpoint, a webhook configuration for 10+ event types, an invoice retrieval endpoint, and a refund processing endpoint. Each has specific headers, authentication, and request body structures. The plugin replacement guide covers the full scope of what each integration entails — API Connectors reveal the specific technical configurations.
The Authentication Complexity
Each API Connector uses one of several authentication methods: API key in header, Bearer token, OAuth2 with token refresh, Basic auth, or custom header authentication. During migration, each auth method must be replicated exactly — a wrong header name or missing token refresh logic causes silent authentication failures that surface as "403 Forbidden" errors in production.
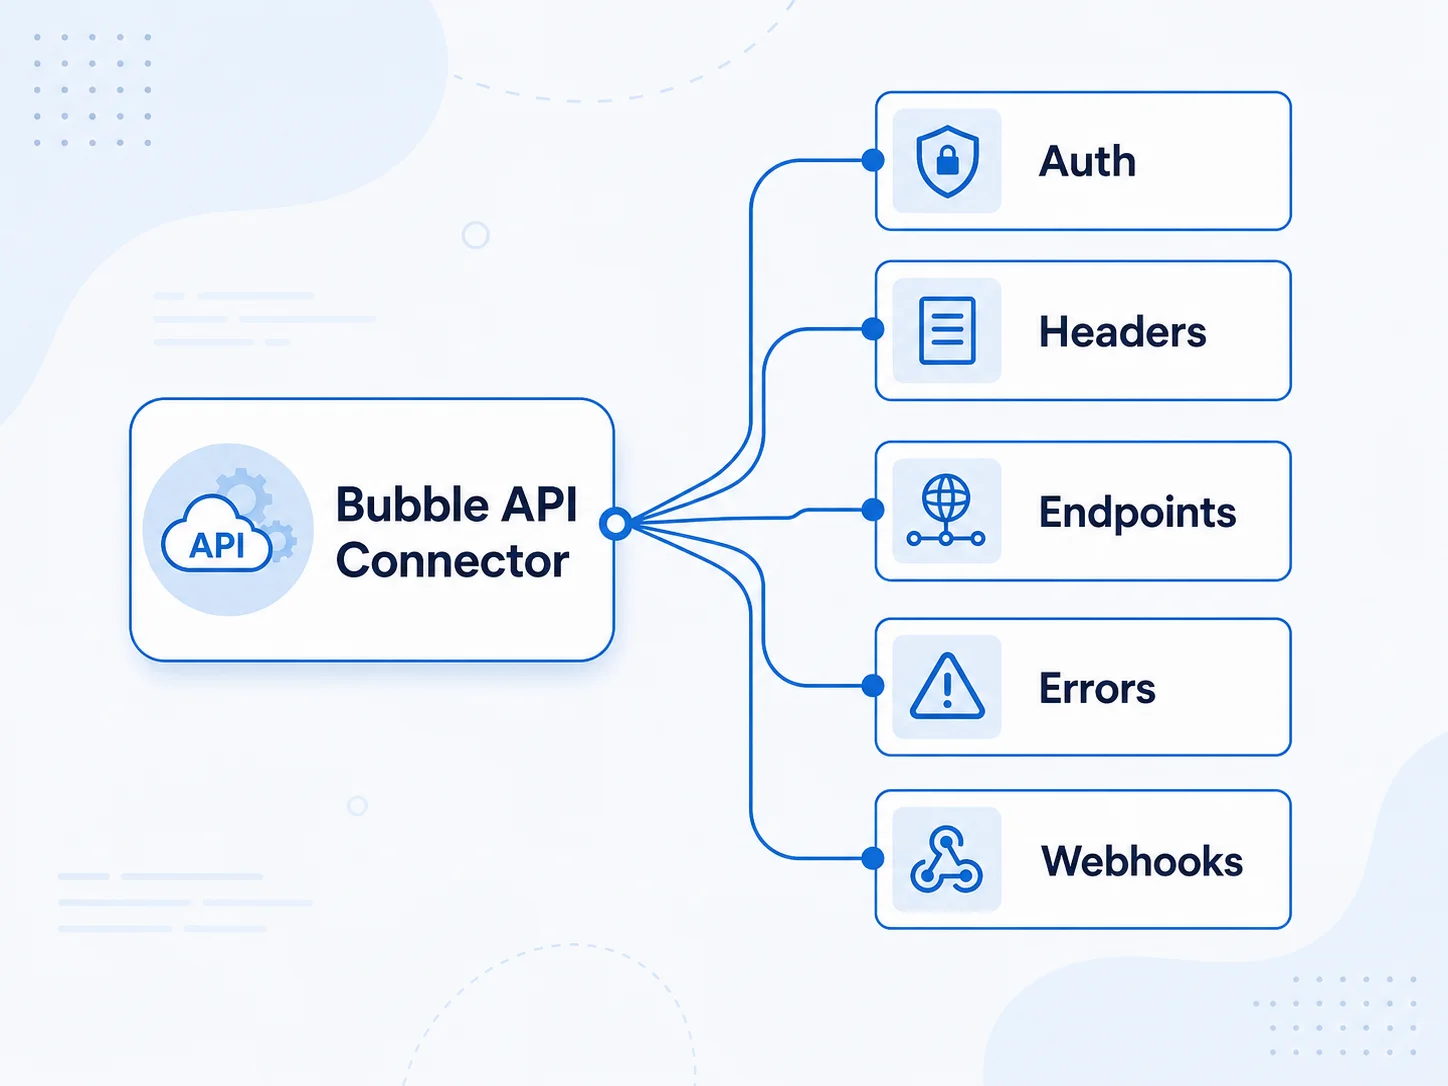
Anatomy of a Bubble API Connector
Every API Connector entry contains six categories of information that must be captured for migration.
| Component | What It Contains | Code Equivalent |
|---|---|---|
| Base URL | Root URL for all endpoints in this connector | Service client base URL configuration |
| Authentication | API key, Bearer token, OAuth2 credentials | Auth middleware / interceptor |
| Shared headers | Headers applied to all calls (Content-Type, custom headers) | Default request headers |
| Endpoints (calls) | Individual API calls with method, path, parameters | Service client methods |
| Parameters | Query params, URL params, JSON body fields | Typed request interfaces |
| Response structure | Expected response fields and types | Typed response interfaces |
Extracting Your API Specifications
Two approaches: manual extraction (clicking through the Bubble editor) or automated extraction (tools that capture connector configurations programmatically).
Manual Extraction Process
Open the API Connector panel in Bubble's editor. For each connector: document the base URL and authentication method, list every endpoint (call) with its HTTP method and path, record every parameter (name, type, whether it is dynamic or static), and note any conditional headers or environment-specific values. A medium-complexity app with 5 to 8 connectors takes 4 to 8 hours to document manually. The risk is human error — missing a parameter, recording the wrong header name, or overlooking a conditional configuration.
Automated Extraction
Relis captures every API Connector configuration automatically — base URLs, auth methods, endpoints, parameters, headers, and response structures — in a structured format ready for developer consumption. This eliminates the human error risk and reduces documentation time from hours to minutes.
The Environment Variable Map
API Connectors contain secrets: API keys, Bearer tokens, OAuth client secrets. During migration, these must become environment variables — never hardcoded. Create a mapping document: for each connector, list every secret and its corresponding environment variable name. Create separate values for development, staging, and production environments.
During migration, API keys move from Bubble's configuration to your codebase's environment variables. A common mistake: accidentally committing a key to Git during development. Use .env.local for development keys (gitignored), environment variables for staging/production, and a secrets manager (AWS Secrets Manager, Doppler, or Vercel Environment Variables) for production deployment. Rotate all production keys after migration to ensure no residual access through the old Bubble configuration.
Translating to Typed Service Clients
Each API Connector becomes a typed service client — a module that encapsulates all calls to one external service with proper types, error handling, and authentication.
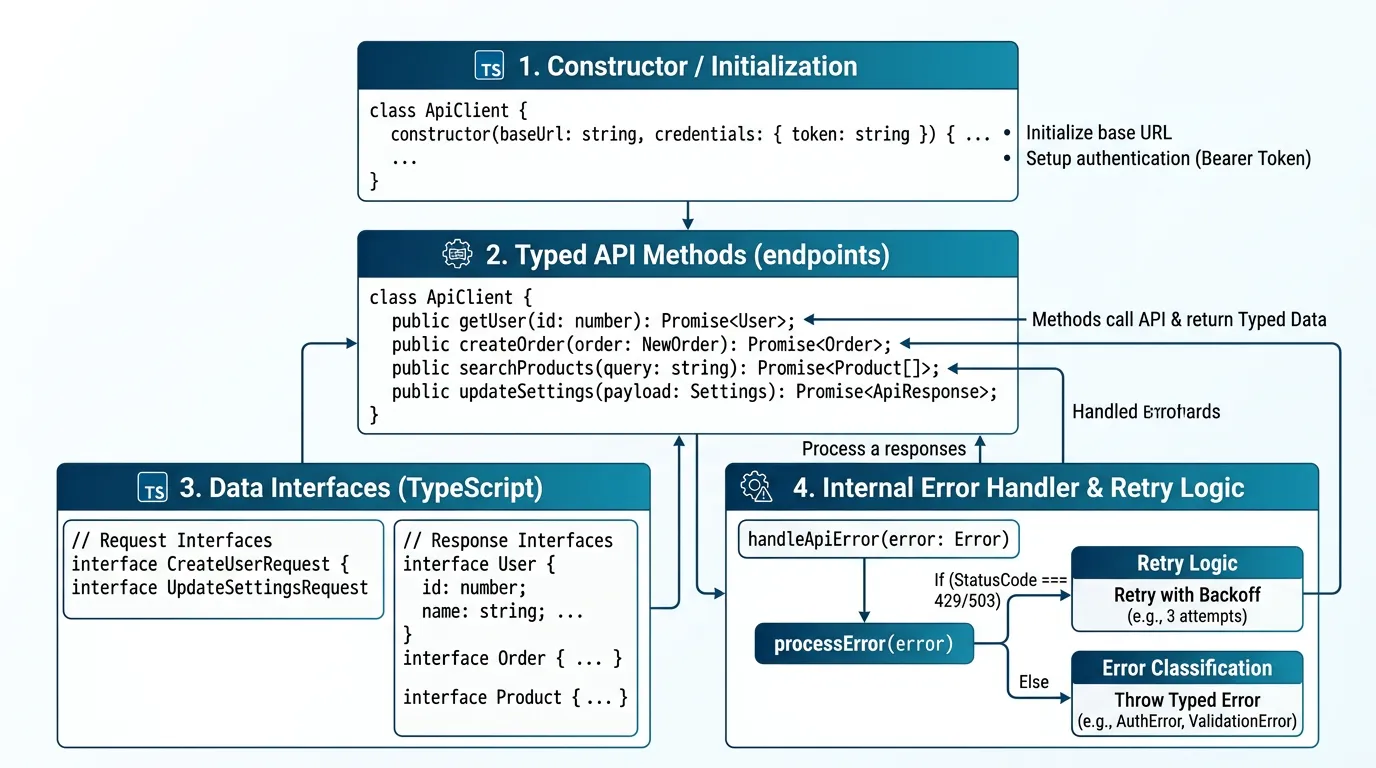
The Service Client Pattern
A well-structured service client has: a constructor that accepts base URL and authentication credentials, typed methods for each endpoint (matching the API Connector calls), request and response type definitions (TypeScript interfaces), error handling that catches and categorizes HTTP errors, and retry logic for transient failures (network timeouts, rate limits).
Type Generation from Specifications
Your API Connector documentation provides the field names and types for each request and response. Translate these to TypeScript interfaces. Bubble's dynamic parameters (values from workflows) become function parameters. Static parameters (hardcoded values in the connector) become defaults in the service client. This type-first approach catches integration errors at compile time rather than in production.
Error Classification
Bubble's API Connector silently handles many error cases — retrying on timeout, ignoring non-critical errors, and providing default responses for failures. In custom code, make error handling explicit. Classify each error type: retriable (timeout, 429 rate limit — retry with backoff), client error (400, 401, 403 — log and alert, do not retry), server error (500, 502, 503 — retry with backoff, alert if persistent), and network error (DNS failure, connection refused — retry with backoff, escalate quickly).
Bubble's API Connector silently swallows many error responses — a 400 from Stripe may produce no visible failure in a workflow. In typed service clients, every response shape is declared up front: if the response does not match the interface, TypeScript surfaces the mismatch at compile time rather than at 2 AM in production. Write your request and response interfaces before writing any fetch logic — the types become the specification your team builds against.
Authentication Patterns: From Bubble to Code
| Bubble Auth Method | Code Implementation | Watch Out For |
|---|---|---|
| API Key in header | Static header on every request | Correct header name (X-API-Key vs Authorization vs custom) |
| Bearer token | Authorization: Bearer {token} header | Token refresh logic if tokens expire |
| OAuth2 | OAuth2 client with token management | Token storage, refresh before expiry, redirect URIs |
| Basic auth | Authorization: Basic {base64(user:pass)} | Encoding format, special characters in credentials |
| No auth (public APIs) | No auth header needed | Rate limiting may still apply |
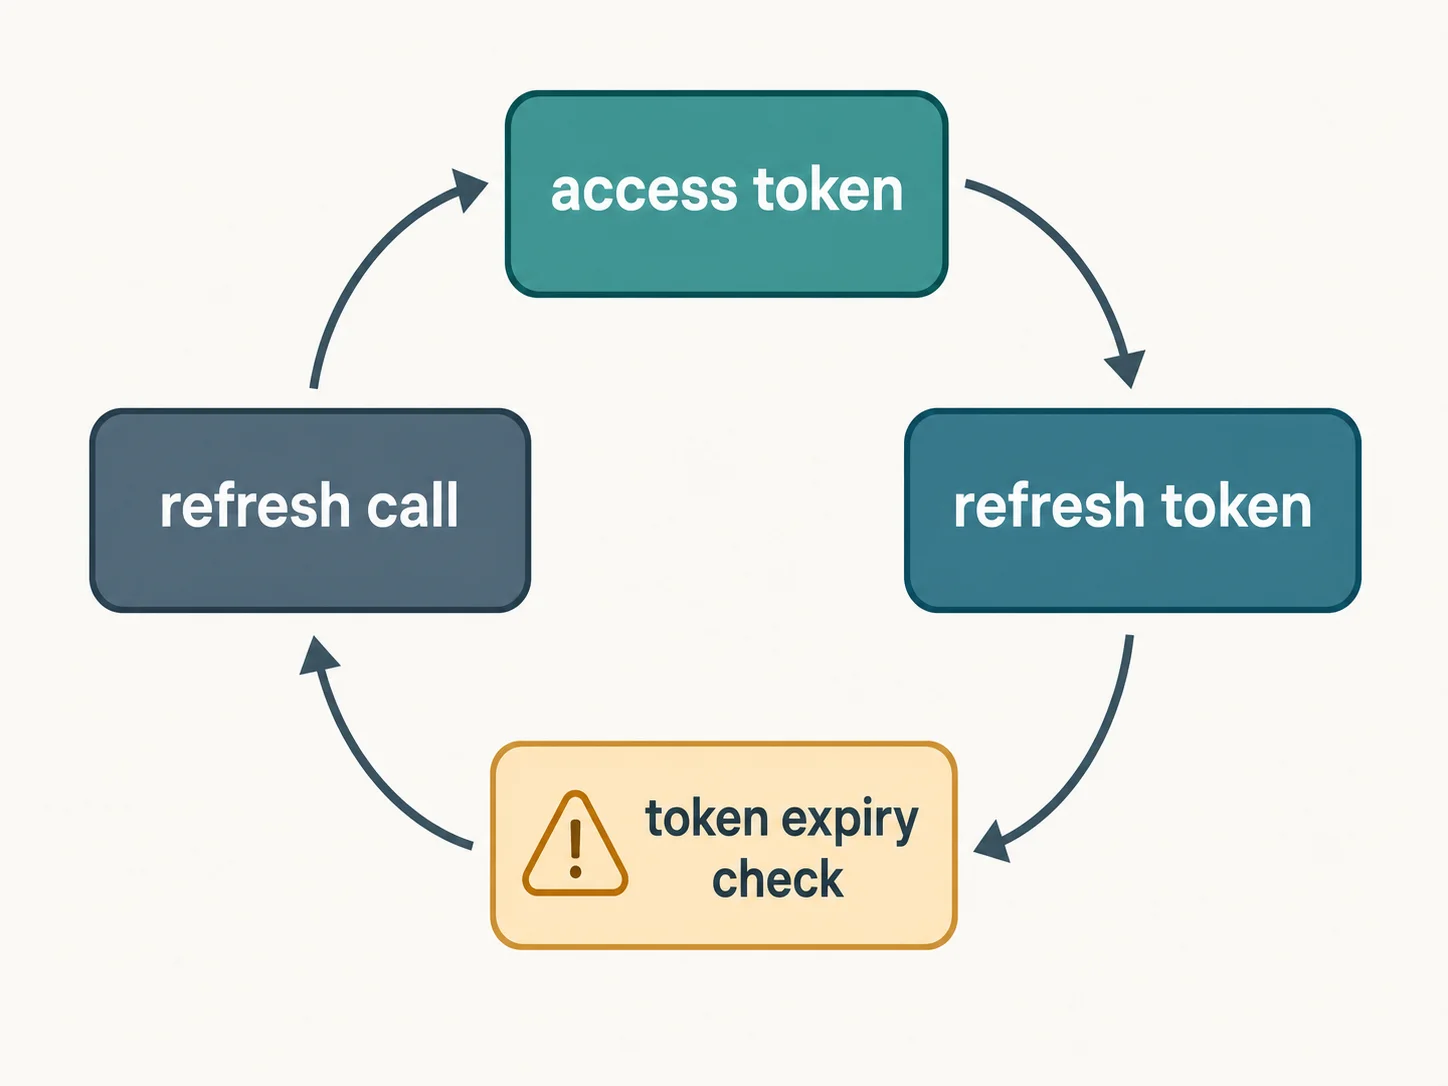
OAuth2 Token Management
Bubble handles OAuth2 token refresh invisibly. In custom code, you must: store the access token and refresh token securely, check token expiry before each API call, refresh the token proactively (before it expires, not after), and handle refresh failures (re-authenticate the user if the refresh token is expired). In practice this often takes a couple of days per OAuth2 integration, depending on token-storage and refresh complexity — time that is routinely missed in migration estimates.
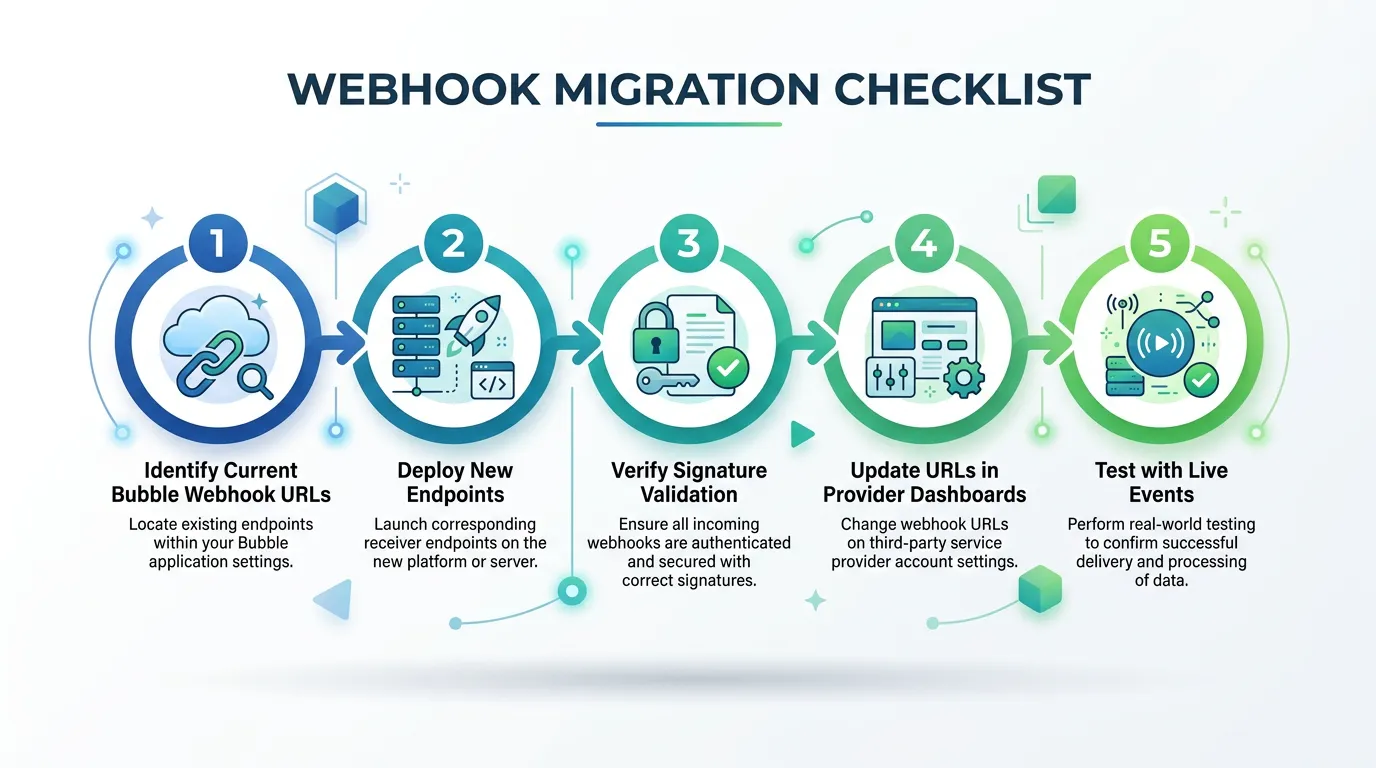
Webhook Migration: The URL Update Checklist
Every external service that sends webhooks to your Bubble app is still pointing to your Bubble URL after migration. If you do not update every webhook URL, events are lost — and the failures are silent because the service thinks it delivered successfully (Bubble returns 200 OK even though your new app never received the event).
The Webhook Audit
For every external service your app integrates with, check: does this service send webhooks? If yes, what is the current webhook URL (your Bubble endpoint)? What is the new webhook URL (your custom code endpoint)? Does the service require webhook signature verification (Stripe, GitHub, Twilio all do)? What events does your app process?
Common Webhook Sources
- Stripe: Payment success, failure, subscription changes, invoice events
- SendGrid/Resend: Email delivery, bounce, open, click events
- Twilio: SMS delivery status, call status callbacks
- GitHub: Push events, PR events (if your app integrates with repos)
- Zapier/Make: Custom automation triggers pointed at your Bubble API
The Signature Verification Requirement
Most production webhook providers sign their payloads with a secret. Your new webhook endpoint must verify this signature before processing the event — otherwise anyone can send fake events to your endpoint. Stripe uses a stripe-signature header with HMAC (Stripe webhook signature docs). Twilio uses request signing with the account auth token (Twilio webhook security docs). Each provider has its own verification method — implement it for every webhook endpoint.
Update webhook URLs in external services after your new endpoints are deployed and tested — but before you decommission Bubble. During the transition window, both systems receive webhooks. Your new system processes them. Bubble receives them but you have disabled the workflows that acted on them. This overlap ensures no events are lost during the switch.
Frequently Asked Questions
Q. How many API Connectors does a typical Bubble app have?
Simple apps: 2 to 4 connectors with 5 to 10 endpoints. Medium apps: 5 to 8 connectors with 15 to 25 endpoints. Complex apps: 10+ connectors with 30+ endpoints. Each endpoint requires its own typed method, request/response types, and error handling in the migrated codebase.
Q. Can I reuse the same API keys after migration?
Yes for most services — API keys are not tied to Bubble. Move them to environment variables in your new codebase. Exception: OAuth2 tokens may need re-authorization if the redirect URIs change. Update redirect URIs in each OAuth provider's dashboard to point to your new domain before migration.
Q. How do I test API integrations before launch?
Use sandbox environments where available (Stripe test mode, SendGrid sandbox). For services without sandboxes, create test accounts with limited permissions. Never test against production APIs with real data or real payments. Run each endpoint through its happy path, error path, and edge cases (rate limiting, invalid input, expired tokens).
Q. What about API Connectors that call my own backend?
Some Bubble apps use API Connectors to call their own API endpoints (internal APIs). During migration, these become internal function calls or service-to-service HTTP calls. If the internal API was used to work around Bubble's limitations (accessing data from backend workflows), the workaround may no longer be necessary in custom code — evaluate whether each internal API call is still needed.
Q. How do I handle API rate limits after migration?
Bubble's API Connector has implicit rate limiting — it queues calls and retries on 429 responses. In custom code, implement explicit rate limiting: track request counts per time window, queue excess requests with exponential backoff, and respect the Retry-After header. Libraries like bottleneck (Node.js) or tenacity (Python) handle this pattern.
Q. Should I rebuild all API integrations at once?
No. Prioritize by criticality: payment integrations first (revenue), authentication integrations second (security), communication integrations third (user experience), then data/analytics integrations last. Test each integration end-to-end before moving to the next. This priority order ensures the most critical integrations get the most testing time.
Extract the Specs, Then Rebuild with Confidence
- API Connectors hold more complexity than their name suggests: A "Stripe integration" is not one thing — it is 6+ endpoints, authentication, webhook processing, and error handling. Each connector must be decomposed into its component parts for accurate scoping.
- Extract specifications before development: Every endpoint URL, auth method, header, parameter, and response structure must be documented. Manual extraction takes hours and risks human error. Automated extraction with Relis captures everything in minutes.
- Build typed service clients: Each connector becomes a typed module with request/response interfaces, explicit error handling, and retry logic. Types catch integration errors at compile time. Error classification prevents silent failures in production.
- Update every webhook URL before cutover: External services sending webhooks to your Bubble URL will silently fail after migration unless you update every webhook configuration. The webhook audit is as critical as the data migration.
- Prioritize by criticality: Payment and auth integrations first, communication second, analytics last. Each integration gets end-to-end testing before the next one starts. This ordering minimizes the blast radius of integration bugs.
API integrations are the connective tissue between your app and the services it depends on. Document every connection, rebuild each one with proper error handling, and test every endpoint before your users encounter it in production.
Extract Every API Connector Specification
Relis documents every API Connector in your Bubble app — endpoints, auth methods, headers, parameters, and response structures — so your developers rebuild each integration from specs, not guesswork.
Scan My App — FreeSee Your Bubble Architecture — Automatically
Stop reverse-engineering by hand. Relis extracts your complete database schema, API connections, and backend workflows in under 10 minutes.
See Your Bubble Architecture — Automatically
Stop reverse-engineering by hand. Relis extracts your complete database schema, API connections, and backend workflows in under 10 minutes.